


How to use CloudFerro AI Hub Sherlock
by Mateusz Ślaski, Sales Support Engineer, and Jan Szypulski, Product Manager, CloudFerro
Introduction
CloudFerro Sherlock service is a managed Generative AI platform designed to empower organizations with advanced artificial intelligence capabilities without the complexity of managing infrastructure. Here are the key features and benefits of the Sherlock service:
- Sherlock offers access to a curated selection of cutting-edge language models, including models such as:
- Llama 3.1 and 3.3
- Mistral AI
- Bielik
- PLLuM
- DeepSeek
- The platform provides OpenAI-compatible endpoints, allowing seamless integration with existing solutions by simply replacing a few lines of code in the OpenAI library.
- Sherlock prioritizes data security and privacy, operating within a Polish data center. It adheres to a strict no-training policy, meaning user data is not stored or used for model training. The CloudFerro platform is ISO 27001 and ISO 9001 certified, ensuring high standards of security and quality management.
- The service is built on enterprise-ready infrastructure, eliminating the need for organizations to invest in and manage their own IT infrastructure. It utilizes powerful GPU processors for high-performance computing.
- With Sherlock Your organization can quickly integrate advanced AI models into your applications without complex technical overhead.
- Sherlock offers a usage-based billing model with a pay-per-token pricing structure, providing granular cost control and transparent pricing.
- The platform is part of a larger Cloud services ecosystem consisting of compute, storage and access to the Earth Observation data repository. All hosted and managed in the EU.
Overall, CloudFerro AI platform is designed to support businesses in leveraging AI for innovation while ensuring high security and privacy standards.
Sherlock platform has brief but essential documentation available at https://docs.sherlock.cloudferro.com/docs/introduction/.
General CloudFerro cloud documentation is available at https://docs.cloudferro.com/en/latest/index.html.
Agenda
In this guide you will get a list of ready-to-use applications providing GUI for LLMs, and then you will learn how to:
- register at CloudFerro cloud
- set up CF Sherlock AI Project
- generate API Key
- connect selected desktop AI GUI application to Sherlock
Selecting LLM desktop GUI applications
To communicate with LLM you may use various desktop applications.
Here is the list of some selected.
- Ollama: Features: open source, allows downloading, managing, and running LLMs locally. Offers both command-line and graphical interfaces, compatible with macOS, Linux, and Windows.
- AnythingLLM: Features: open source, multi-modal support, integrates with various LLMs and vector databases. Offers multi-user support, customizable chat widgets, and supports multiple document formats.
- Jan: Features: open source, allows running models like Mistral and Llama offline. Supports importing models from Hugging Face and accessing models via OpenAI compatible API.
- LM Studio: Features: Simple interface for finding, downloading, and running models from Hugging Face. Mimics OpenAI’s API for easy integration.
With some research you can find other similar applications and with some analysis taking into consideration your business needs you will choose the one.
For the purpose of this guide, we choose Jan application as it is Open Source software, it has versions for MacOS as Linux and for Windows. Additionally, and they state that are focused on privacy.
Registering in CloudFerro cloud
To use Sherlock’s API, you need to be an admin user of an Organization registered at the CloudFerro Cloud.
A detailed process of registration is described in this article Registration and Setting up an Account.
Remember to set up your organization, as well. You can read how to do it in the article Adding and editing Organization.
Once you are ready, you will be able to create your first project.
Project creation
To generate API key go to Sherlock Control Panel.
You will see empty "List of projects".
Fill the text entry box below “Create new project” label with a name and press the button “Create”.

Authentication
Sherlock by CloudFerro uses API keys for authentication. You can create API keys within the created project in your Control Panel.
To generate API key, go to Sherlock Control Panel.
You should see the project created in the previous step:

Click “Details” to open a view for the selected project.
In Sherlock management panel, the API_KEY is called “service key”. Please scroll the view down. You will see the section dedicated to creating keys.

Enter a name for your key and press “Create” button.
You will get the following panel.
Click “Copy” to get key value.
Than save it in a secure location as Password Manager application or service.

Remember that your API key is secret! Do not share it with others or expose it in any client-side code (browsers, apps). Production requests must be routed through your own backend server where your API key can be securely loaded from an environment variable or key management service.
Finding endpoints that will be used in Chat GUI application
Please open Sherlock documentation Models Endpoint. You will see example Python code and example CURL execution.
Please note the following url: https://api-sherlock.cloudferro.com/openai/v1/models
Please open Sherlock documentation Chat Completion Endpoint.
You will see example Python code and example CURL execution.
In this case CURL execution contains the exact link that we are interested in. Url to note is:
GUI installation
Go to Jan application homepage and download version for your platform. Then, follow the platform related instructions.
When application starts, you will see the window:

To use CloudFerro Sherlock in Jan, you must install a remote engine. Select the hamburger menu just beside the hand icon “☰” then select “Jan” and “Settings”.

Select “Engines” on the left side bar.

Then press “+ Install Engine” button.

You will see the following window:

On this screenshot there are all fields with the data collected in the previous steps:
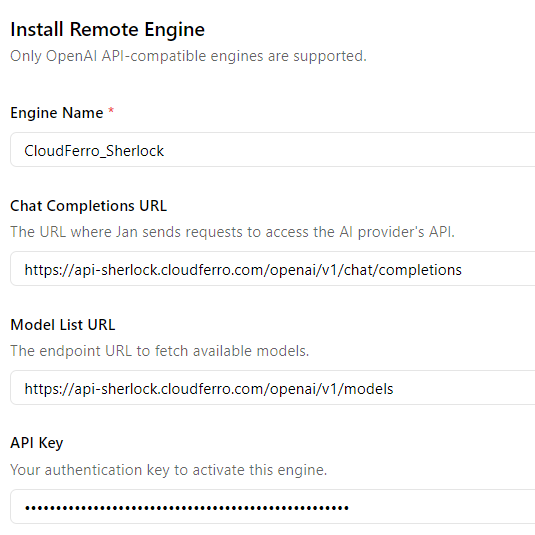
Scroll the window to the bottom and press “Install button”.

Click speech bubble icon “🗩” on the left side. You will see the “New Thread” window.

Click “Select a model” at the bottom.
You will see CloudFerro Sherlock.

Expand the available models list by clicking“˅” arrow.

Select the model that you want to use.
For this guide, I selected Llama-3.3.
Type your prompt in the field titled “Ask me anything”.
For example, if you enter:
Generate Python "Hello World!" program.
you will receive an answer with the corresponding code:

When you go to Sherlock Billing summary, you will see tokens spent on your conversations.

Summary and further steps
You are now able to set up and use the CloudFerro Sherlock platform with the GUI application (Jan or others after adapting this procedure). You can test hosted models with your data without worrying about its privacy.
In the Sherlock documentation you will find more examples, especially how to use the models with Python code and integrate them with your applications.
Happy prompting!
Explore Sherlock platform
Discover a fully managed Generative AI platform with OpenAI-compatible endpoints, enabling seamless integration of advanced AI capabilities into your applications. Access high-performing language models through a unified API, eliminating the complexity of infrastructure management and model operations.